Create your own Cycles
The guide 'Storing Chronology Statements' demonstrates how to store inconclusive date statements in nodegoat, while the guide 'Storing Relational Chronology Statements' shows how to use references as dates. This guide will demonstrate how to create cycles and how to use them in your Chronology Statements.
A cycle is a recurring time span. The duration of this time span can be defined by you. Examples of cycles are quarters (i.e. Q1, Q2, Q3, Q4), seasons (e.g. spring, summer, fall, winter), or semesters (e.g. winter semester, summer semester).
While some cycles are mathematical subdivisions of a year (e.g. quarters), most cycles are qualitative statements (e.g. seasons) that can vary over time (e.g. semesters). By allowing you to define these cycles, you decide whether winter starts on the 21st of December or the 21st of June, or whether you want to work with a set of seasons for the northern hemisphere and a set of seasons for the southern hemisphere.
This guide uses the Data Model that was created in the guides on creating an Object Type and on adding a related Object Type.
Enable Cycles
To use the Cycle functionality in your environment you need to enable this in a project. To do so, go to Management and Project. Click the blue edit button for the Project in which you want to enable Cycles. Check the checkbox shown next to the label 'Cycle', shown under the heading 'System'.

Add Cycles
Go to the Data section of your environment. Go to the tab 'System' and click 'Cycle'. To add a cycle, click 'Add Cycle'. This form allows you to specify when a cycle starts and when a cycle ends. To enter the first quarter of a year, enter 'Q1' as a name and enter '1' for the start day and enter '1' the start month. As a quarter lasts 3 months, you enter '3' for the end month (+ 3 months). Leave the end day and end year blank.
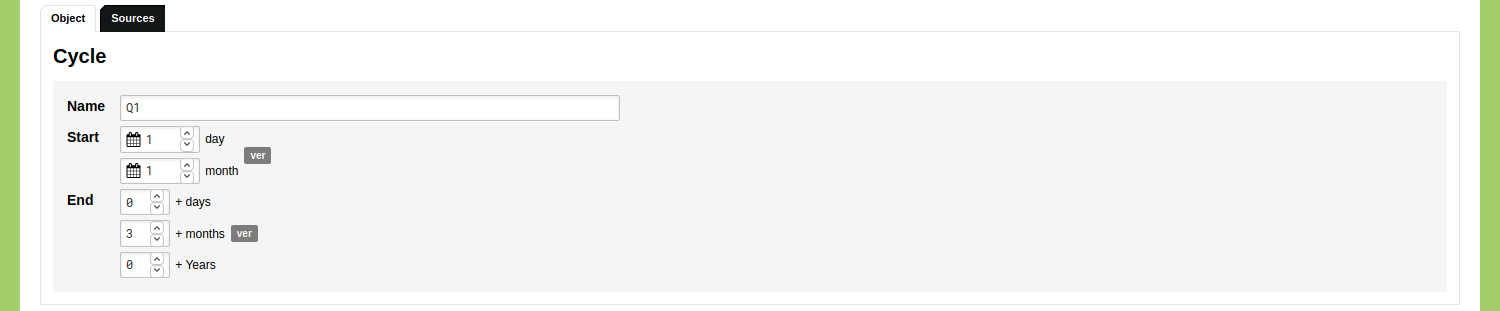
Click 'Save Cycle'. Repeat these steps for Q2, Q3, and Q4, starting at 3, 6, and 9 months respectively and lasting 3 months.
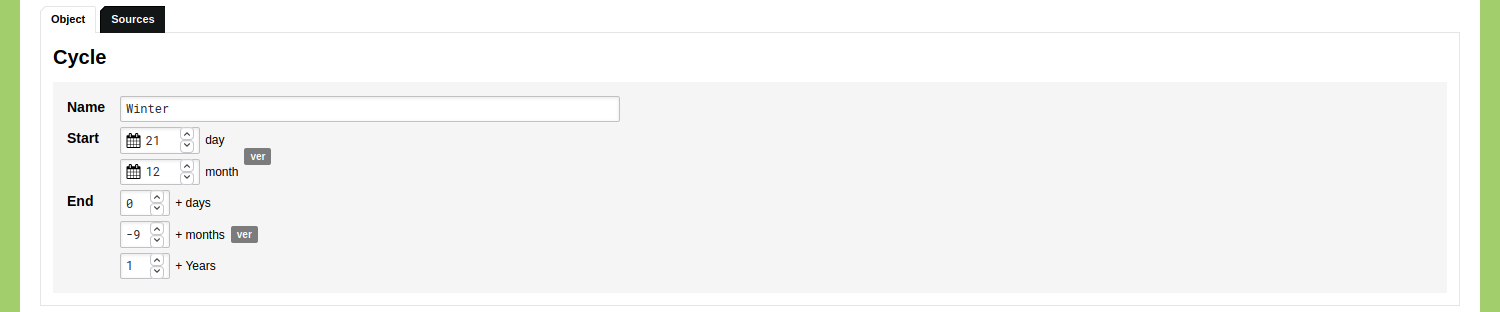
To enter the seasons for the northern hemisphere click 'Add Cycle' and name the first cycle 'Spring'. Enter '21' for the start day and '3' for the start month. Enter '3' for the end month. Click 'Save Cycle'. For the cycle 'Summer' you enter '21' for the start day, '6' for the start month, and '3' for the end month. For the cycle 'Fall' you enter '21' for the start day, '9' for the start month, and '3' for the end month. The 'Winter' cycle requires a different approach as this cycle spans multiple years. To account for this you enter '21' for the start day, '12' for the start month, and '-9' for the end month and '1' for the end year. This means that a full year minus 9 months are added to this cycle, which amounts to a plus of 3 months.
Use Cycles
By using Cycles in Chronology Statements, you can make a statement like: Person X lived in City Y between the summer of 1848 and the spring of 1854.
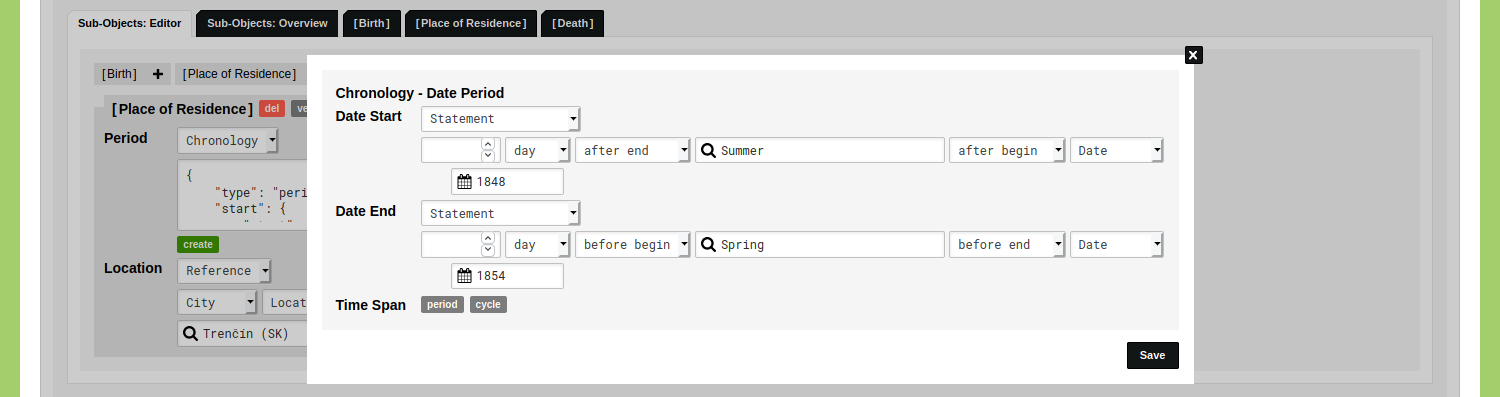
Go to the Data section of your environment, open the Object Type ‘Person’, and add a new Object. Scroll down to the Sub-Objects Editor and click on the plus icon next to ‘Place of Residence’. Change the dropdown menu from 'Point' to 'Chronology'. Click the green 'create' button to open the Chronology Statement dialog. Change both dropdown menus from 'Point' to 'Statement'.
Start by clicking the grey 'cycle' button in the Date Start statement. Change the cycle operator from 'after begin' to 'after end' and use the input field with the magnifying glass to select the cycle 'Summer'. Leave the date operator to 'after begin' and enter the date '1848'. This statement is now configured to generate the date 21-09-1848, as this is the first date after the end of the summer of the year 1848.
Next, click the the grey 'cycle' button in the Date End statement. Change the cycle operator from 'after begin' to 'before begin' and use the input field with the magnifying glass to select the cycle 'Spring'. Change the date operator from 'after begin' to 'before end' and enter the date '1854'. This statement is now configured to generate the date 21-03-1854, as this is the first date before the begin of the spring of the year 1854.
Your Chronology Statement should now look like this:
Click 'Save'. You will now see the generated ChronoJSON representation of this statement:
{
  "type": "period",
  "start": {
    "start": {
      "cycle_object_id": 9821255,
      "cycle_direction": "||>",
      "date_value": "1848",
      "date_direction": "|>|"
    }
  },
  "end": {
    "end": {
      "cycle_object_id": 9821254,
      "cycle_direction": "<||",
      "date_value": "1854",
      "date_direction": "|<|"
    }
  }
}
Click 'Save Person' and open the Object to view it. Click on the 'Place of Residence' Sub-Object to inspect the Chronology Statement.
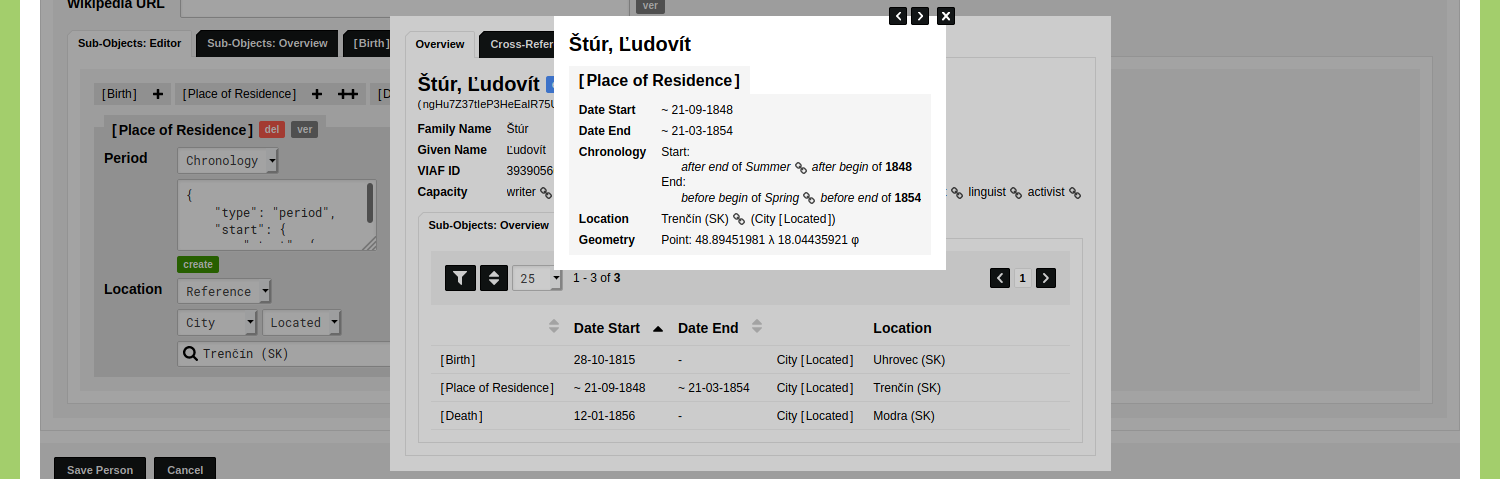
This place of residence is now dated as a period between 21-09-1848 and 21-03-1854. The data contains a description on how the period has been established. This date is used in the visualisations, filters, and analyses.
Cycles can also be used to identify time spans in a date or period. This allows you to state that a letter was sent in the summer semester of 1836, or that a person lived in a city during the spring of 1867.