Storing Relational Chronology Statements
The guide 'Storing Chronology Statements' demonstrates how to store inconclusive date statements in nodegoat. This guide will demonstrate how to store inconclusive date statements that use other date statements as a reference, e.g.: 'letter X was sent one month after letter Y', or 'letter X was sent between letter Y and letter Z'.
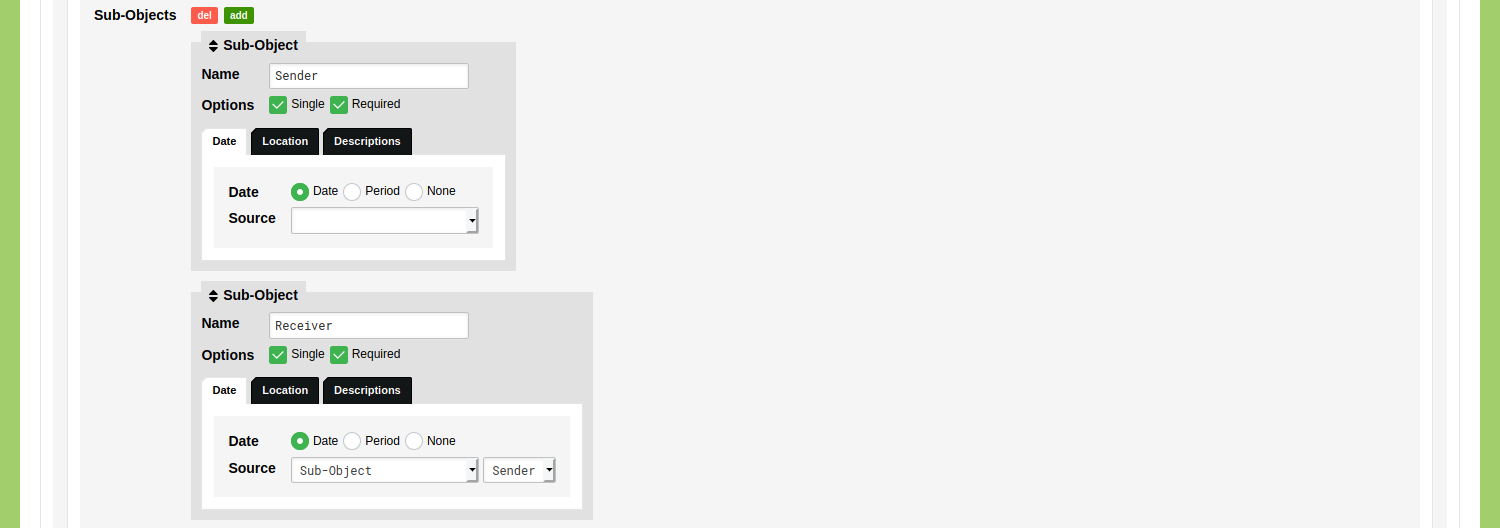
This guide uses the Data Model that was created in the guides on creating an Object Type and on adding a related Object Type. The Object Type 'Letter' that was defined there has two Sub-Objects: 'Sender' and 'Receiver'. Both Sub-Objects take their date from the Object Description 'Date'. In order to use the Chronology Statement you need to change this so a date can be defined in the Sub-Object. Go to Model and edit the Object Type 'Letter'. Go to the tab 'Sub-Object'. In the 'Sender' Sub-Object: change the dropdown menu for 'Source' from 'Object Description' to a blank value. Do the same for the 'Receiver' Sub-Object if you want to enter a date there as well. If you want to use the same date for the moment of receiving as for the moment of sender, change 'Object Description' to 'Sub-Object' and select the 'Sender' Sub-Object.
Letter X was sent one month after Letter Y
Go to the Data section of your environment, open the Object Type ‘Letter’, and add a new Object. Scroll down to the Sub-Objects Editor and click on the plus icon next to ‘Sender'. Next to the label 'Date' you see a dropdown menu and an input field. Change the dropdown menu from 'Point' to 'Chronology'. You will now see an input field in which a Chronology Statements that has been formatted as ChronoJSON can be entered. To generate this ChronoJSON click the green 'create' button displayed below the input field.
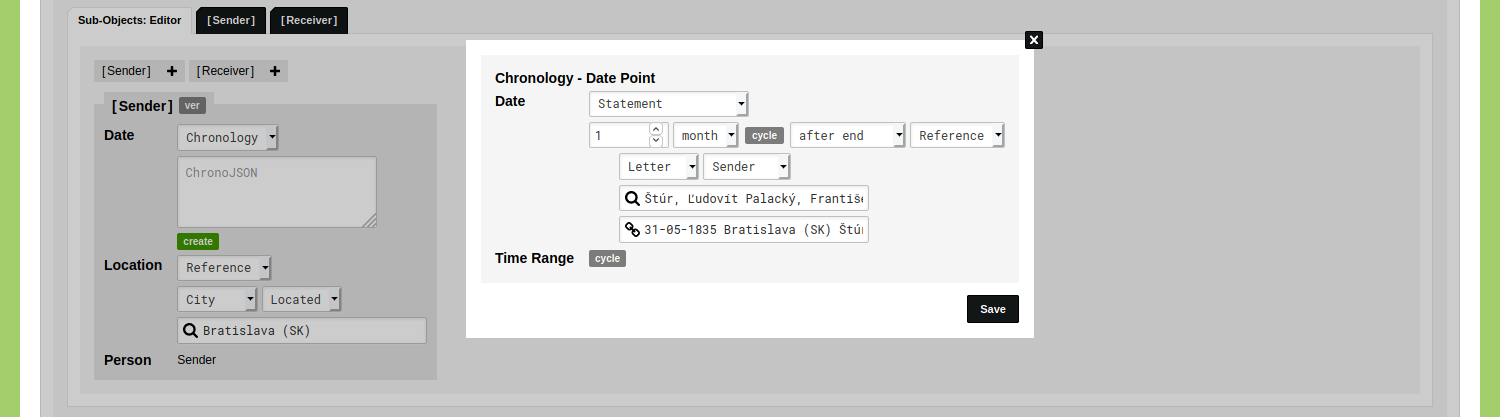
Change the dropdown menu from 'Point' to 'Statement'. The input field is now supplemented with five additional options. These options allow you to make an elaborate statement about this date.
Enter '1' in the first input field and change the first dropdown menu from 'day' to month. Change the operator from 'after begin' to 'after end'. The last dropdown menu is set to 'Date', which allows you to enter a date for this statement. Change this dropdown menu from 'Date' to 'Reference' in order to use a reference to another date. After you have selected 'Reference' you see four new options appear: a dropdown menu to select a Type of Objects (e.g. 'Letter'), a dropdown menu to select a Sub-Object (e.g. 'Sender'), an input field with a magnifying glass to select a specific Object and an input field with a link to select a specific Sub-Object. These options allow you to use any date that has been stored in your environment as a reference.
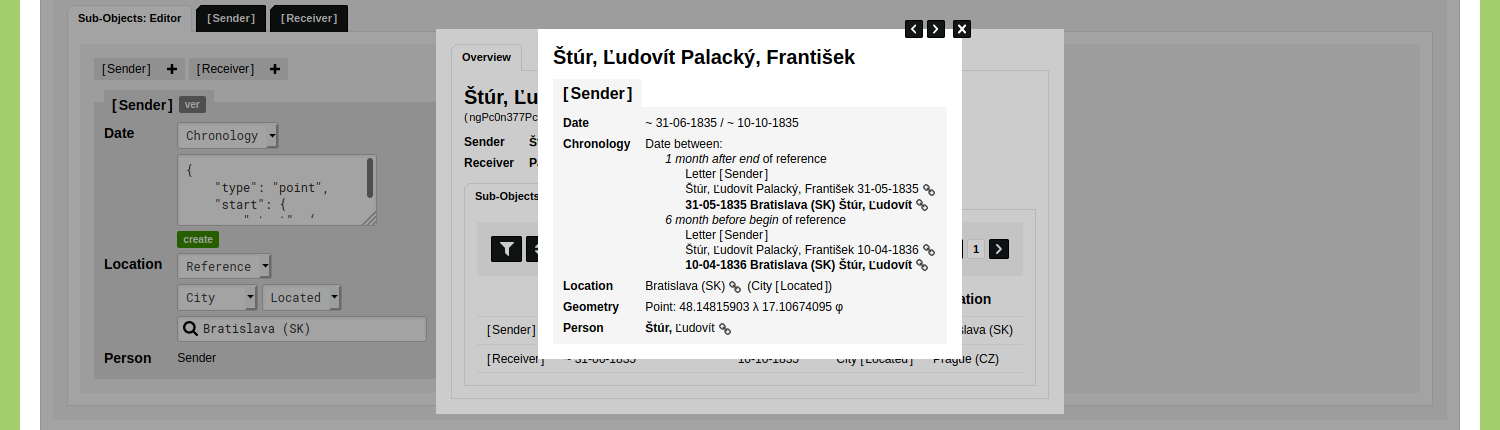
In this case you set the Type to 'Letter' and select the Sub-Object 'Sender'. Find the Object you want to use by means of the input field with the magnifying glass, e.g. 'Štúr, Ľudovít Palacký, František 31-05-1835'. Select the Sub-Object you want to use by clicking the input field with the link, e.g. '31-05-1835 Bratislava (SK) Štúr, Ľudovít'.
Your Chronology Statement should now look like this:
Click 'Save'. You will now see the generated ChronoJSON representation of this statement:
{
  "type": "point",
  "start": {
    "start": {
      "offset_amount": 1,
      "offset_unit": "month",
      "date_object_sub_id": 15646112,
      "date_direction": "||>"
    }
  }
}
Click 'Save Letter' and open the Object to view it. Click on the 'Sender' Sub-Object to inspect the Chronology Statement.
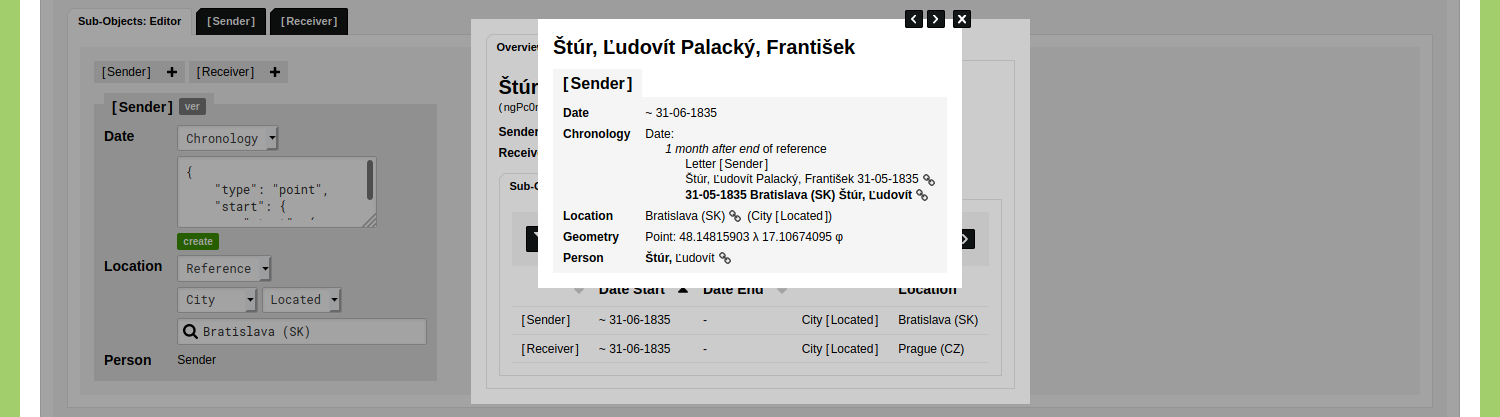
This letter is now dated as 31-06-1835, and contains a description on how the date has been established. This date is used in the visualisations, filters, and analyses.
Letter X was sent between Letter Y and Letter Z
Add a new Object of the Type 'Letter'. Scroll down to the Sub-Objects Editor and click on the plus icon next to ‘Sender'. Change the dropdown menu from 'Point' to 'Chronology' and click the green 'create' button displayed below the input field.
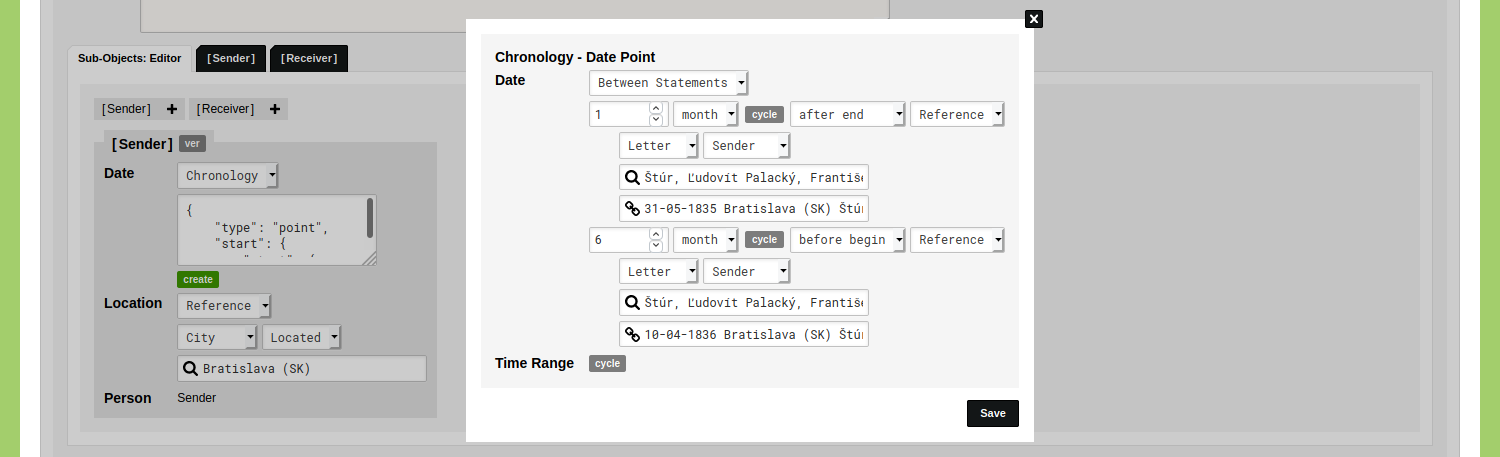
Change the dropdown menu from 'Point' to 'Between Statements'.
Configure the first statement as follows: enter '1' in the first input field and change 'day' to 'month', change the operator from 'after begin' to 'after end' and change 'Date' to 'Reference'. Set the Object Type to 'Letter' and select the Sub-Object 'Sender'. Find the letter 'Štúr, Ľudovít Palacký, František 31-05-1835' and select the Sub-Object '31-05-1835 Bratislava (SK) Štúr, Ľudovít'.
Configure the second statement as follows: enter '6' in the first input field and change 'day' to 'month', change the operator from 'after begin' to 'before begin' and change 'Date' to 'Reference'. Set the Object Type to 'Letter' and select the Sub-Object 'Sender'. Find the letter 'Štúr, Ľudovít Palacký, František 10-04-1836' and select the Sub-Object '10-04-1836 Bratislava (SK) Štúr, Ľudovít'.
Your Chronology Statement should now look like this:
Click 'Save'. You will now see the generated ChronoJSON representation of this statement:
{
  "type": "point",
  "start": {
    "start": {
      "offset_amount": 1,
      "offset_unit": "month",
      "date_object_sub_id": 15646112,
      "date_direction": "||>"
    },
    "end": {
      "offset_amount": 6,
      "offset_unit": "month",
      "date_object_sub_id": 15646020,
      "date_direction": "<||"
    }
  }
}
Click 'Save Letter' and open the Object to view it. Click on the 'Sender' Sub-Object to inspect the Chronology Statement.
The sending of this letter has now been stored to have occurred in a range between 31-06-1835 and 10-10-1835. A description on how this range has been established is always available by inspecting the Chronology Statement. This range is used in the visualisations, filters, and analyses.
Letter X was sent after Person Y left City Z
Add a new Object of the Type 'Letter'. Scroll down to the Sub-Objects Editor and click on the plus icon next to ‘Sender'. Change the dropdown menu from 'Point' to 'Chronology' and click the green 'create' button displayed below the input field.
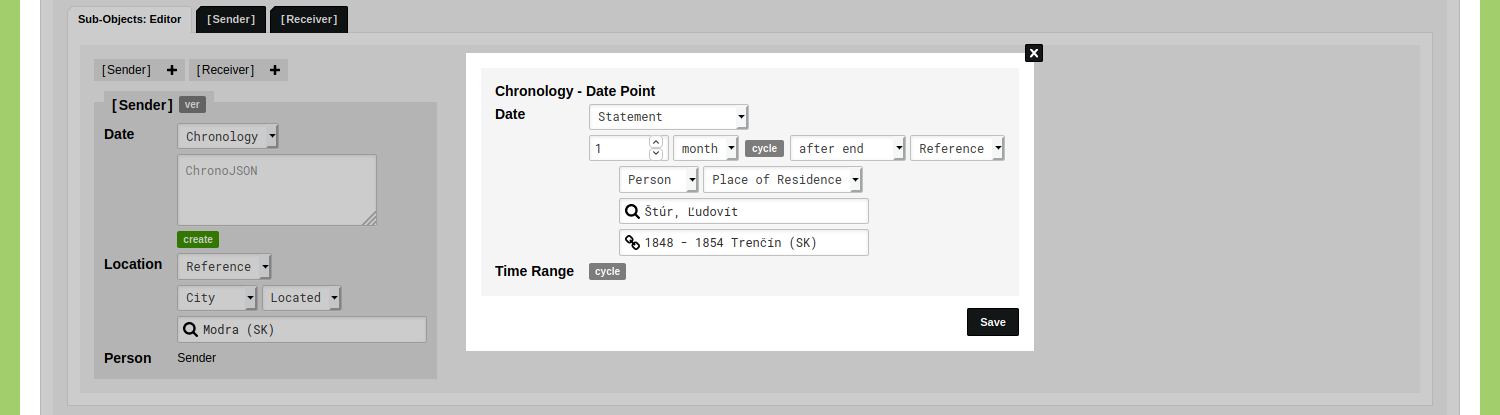
Change the dropdown menu from 'Point' to 'Statement'.
Enter a '1' in the first input field and change 'day' to 'month'. Change the operator from 'after begin' to 'after end' and change 'Date' to 'Reference'.
Set the Object Type to 'Person' and select the Sub-Object 'Place or Residence'. Find an Object of a person by means of the input field with the magnifying glass and select a Sub-Object via the input field with the link.
Your Chronology Statement should now look like this:
Click 'Save'. You will now see the generated ChronoJSON representation of this statement:
{
  "type": "point",
  "start": {
    "start": {
      "offset_amount": 1,
      "offset_unit": "month",
      "date_object_sub_id": 16345280,
      "date_direction": "||>"
    }
  }
}
Click 'Save Letter' and open the Object to view it. Click on the 'Sender' Sub-Object to inspect the Chronology Statement.
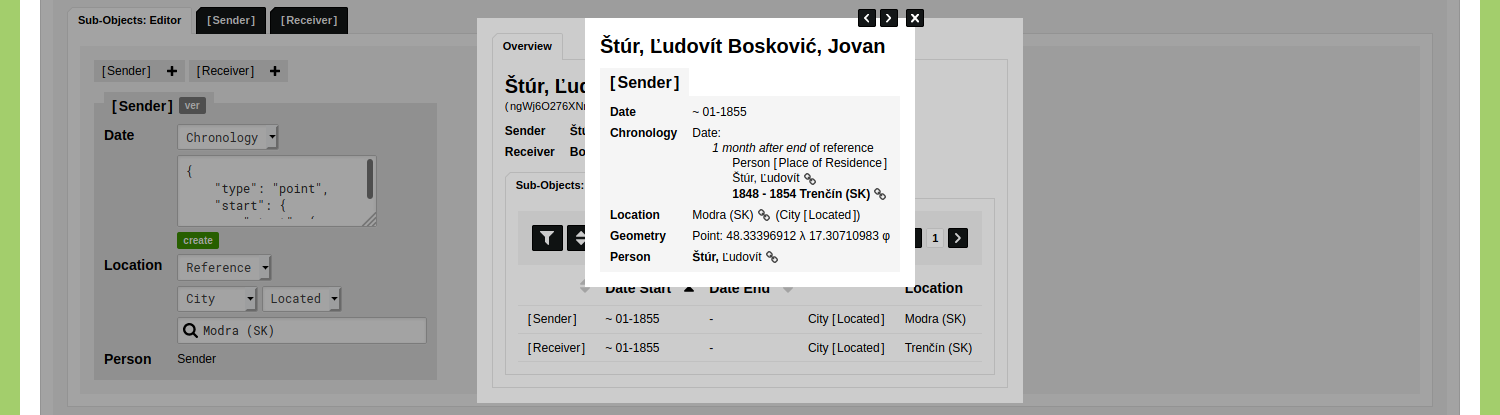
This letter is now dated as 01-1855, and contains a description on how the date has been established. This date is used in the visualisations, filters, and analyses.
These functionalities can be applied on your data model, e.g.: you can use Chronology Statements to date vases by references to the end of the reign of a king, or date a composition by a reference to its Uraufführung.