Import Relational Data
This guide demonstrates how to import relational data to nodegoat. To make this work, you need to have three things in place: a data model that has relationships, data in your nodegoat environment, a CSV file with identifiers that are also present in your nodegoat environment. This guide demonstrates how to import relational data by using a dataset as an example: correspondence data of nineteenth century European intellectuals. This dataset is a subset of a data collection of the Study Platform on Interlocking Nationalisms of the University of Amsterdam.
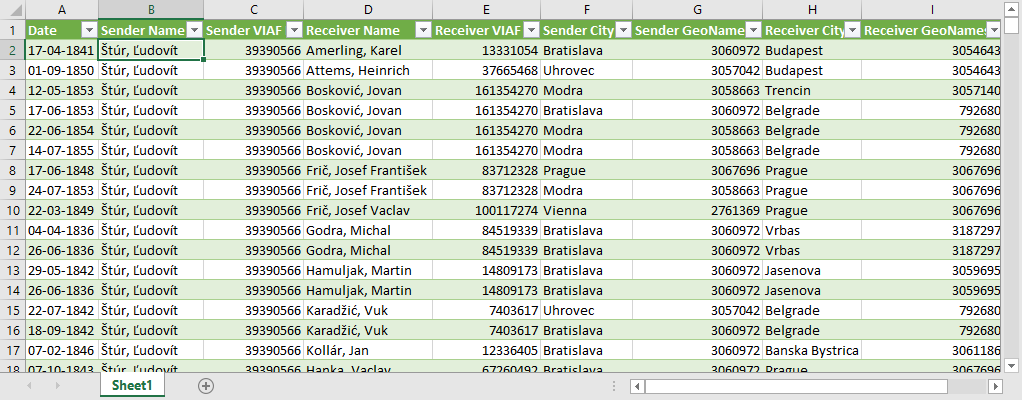
The correspondence data that we will import contains the basic meta data about 2111 letters. Each letter has information about the date of the letter, sender, receiver, sending location, and receiving location. You can download this data as a Microsoft Excel file, a LibreOffice Calc file, or as a CSV file. Below you see a screenshot of this data in Microsoft Excel. The most important thing to note here is that for each person and location, there is not just a name available, but also a unique identifier. Every person has a VIAF ID (e.g. '39390566' for Ľudovít Štúr), and every location has a GeoNames ID (e.g. '3060972' for Bratislava). These identifiers will be used to make relationships.
To make sure everything is configured correctly before running a relational import, we go over the three requirements one by one:
1. A Data Model that has relationships
This guide uses the Data Model that was created in the guides on creating an Object Type and on adding a related Object Type. By following the steps in these guides you will create a model that can host the people as well as the letters in this dataset. The relationships between the letters and the people are stored in each Object of a letter. To be able to store these relationships, a relational Object Description has to be present there. This relational Object Description should be linked to the Object Type 'Person'.

The Sub-Objects for the sending and the receiving of each letter are used to store the locations of these events. Both the 'Sender' and the 'Receiver' Sub-Objects have a location reference to the shared Type 'City'. More information on the shared Object Type 'City' can be found in the guide 'Create your first Project'.
2. Data in your nodegoat environment
This guide uses the data imported in the guide on adding and running an Import Template. This data includes all the people who have sent and received the letters mentioned above. For the locations of the letters we make use of the shared Object Type 'City'. More information on the shared Object Type 'City' can be found in the guide 'Create your first Project'.
3. A CSV file with identifiers that are also present in your nodegoat environment
To establish a relationship to the Objects of the Type 'Person', we will make use of the VIAF ID of the people we have imported in the guide on adding and running an Import Template. As you can see above, this VIAF ID is also present in the dataset with the letters. You see that the VIAF ID of the person Ľudovít Štúr corresponds with the VIAF ID of the Object of Ľudovít Štúr in the Object Type 'Person'.
To establish a relationship to the Objects in the shared Object Type 'City', we will make use of the GeoNames ID of the cities. You see that the GeoNames ID of the location 'Berlin' in the dataset with the letters corresponds to the GeoNames ID of the Object of Berlin in the shared Type 'City'.
Run the import
Upload the CSV file with the letters. After you have uploaded this file, you go to the tab 'Import Template' and click on 'Add Import Template'. Select the uploaded CSV file that contains the letters and the target Object Type 'Letter'. Give the Import Template a name like 'My first relational import'. Since the import will add new Objects to the Type 'Letter' you can leave the Mode set to 'Add New Objects'.
Next, connect the column headings of the CSV file to elements in the Object Type 'Letter'. Connect the column heading 'Date' to the Object Description 'Date'. Connect the column heading 'Sender VIAF ID' to the Object Description 'Sender'. Connect the column heading 'Receiver VIAF ID' to the Object Description 'Receiver'. Connect the column heading 'Sender GeoNames ID' to the Sub-Object 'Sender' Location Reference . Connect the column heading 'Receive GeoNames ID' to the Sub-Object 'Receiver' Location Reference. Set the column headings 'Sender Name', 'Receiver Name', 'Sender City', 'Receiver City' to empty values and use the red 'del' button to remove them.
Every relational element has an additional drop-down menu with the label 'Element that will be used to make a Reference. If left blank, Quicksearch Descriptions will be used.' You can use this to connect the identifier used in the CSV file used for this import to an identifier that is already present in nodegoat. In this case, we use the VIAF IDs of the people who have sent or received a letter to establish a connection between the letter and their Object in the Type 'Person'. To use this connection, select the Object Description 'VIAF ID' of the type 'Person' here.
The same logic is used for establishing a connection between the letters and the locations where the letters were sent and received. The CSV contains the GeoNames IDs of these locations. These locations are stored in the Object Description 'GeoNames ID' in the shared Object Type 'City'. To use this connection, select the Object Description 'GeoNames ID' in the shared Object Type 'City'.
Your Import Template should now look like this:

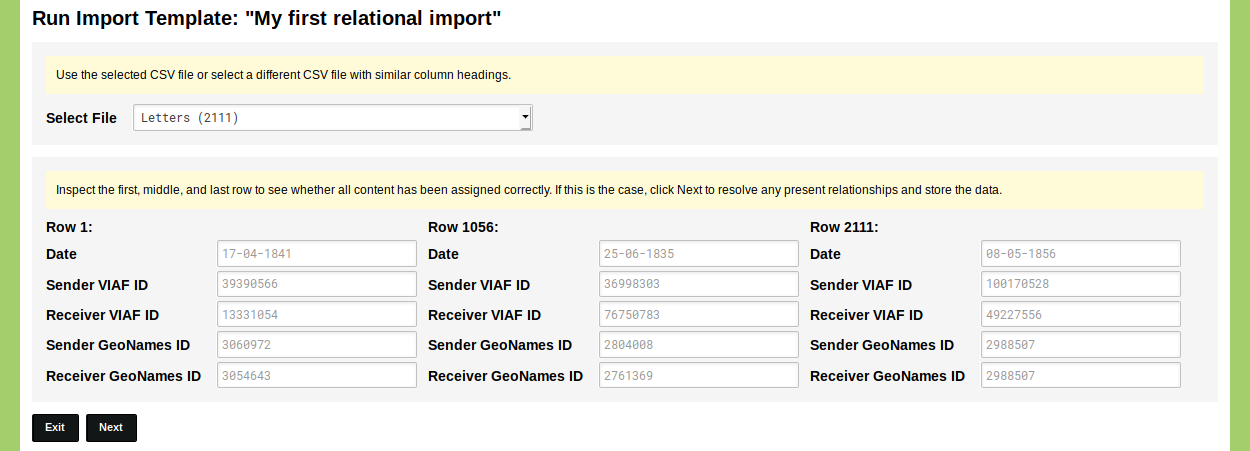
Click 'Save Import Template'. The Import Template is now listed in your overview of Import Templates. Click the green 'run' button on the right side of this overview to run the Import Template. Select the CSV file you want to use and inspect the displayed fields to see whether everything has been configured correctly. If everything is correct, click 'Next' to run the Import Template.
The Import Template will now connect the IDs in this CSV file to the Objects in your nodegoat environment. Depending on the size of the CSV file and the amount of Objects this can take seconds or several minutes.
If any ambiguous data is found, the Import Template will ask you to make a choice based on the data in your CSV file. If no ambiguity is found, or once all ambiguity has been dealt with, the data will be added.
Click 'Exit' and navigate to the Pattern Pairs interface. There you see connections that have been made between the strings in your CSV files and Objects in your nodegoat environment. If these are incorrect or outdated, you can remove them.
Navigate to the Data section of your nodegoat environment to inspect the result of your import process. An import of the data in the CSV file with letters allows you to generate diachronic geographical and social graphs of correspondence networks.