Add a related Object Type
We will now add a new Object Type called 'Letter' so we can start adding Objects of letters that were sent and received by Objects of persons in the Type 'Person'. Go to Model and click 'Add Type' to add a new Type. Name this Type 'Letter'.
Object Name
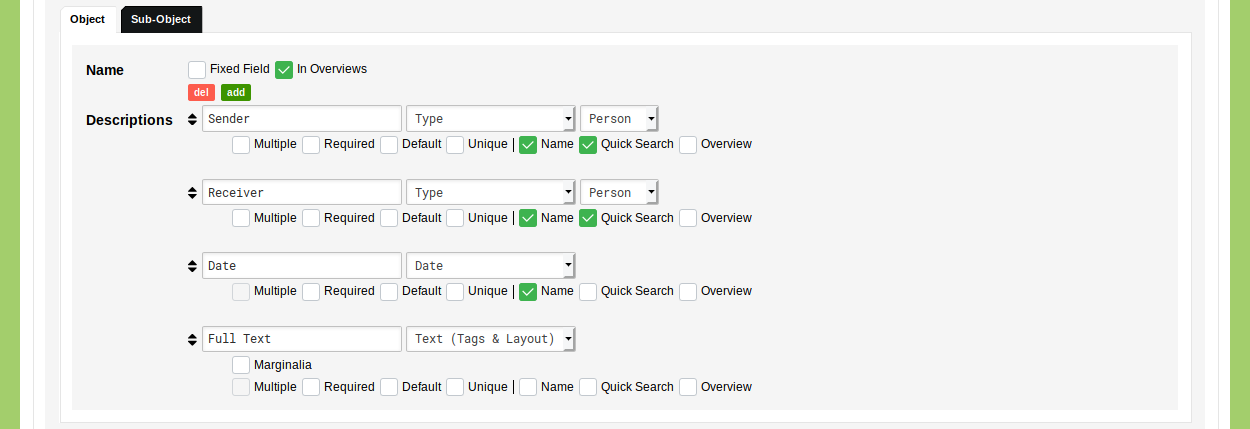
The names of each letter Object will be automatically generated based on the value of the Sender, Receiver, and Date Object Description. This means that we don't need a fixed field for the Name of Objects in this Type. Uncheck the 'Fixed Field' checkbox for Object Name.
Object Descriptions
We will use four Object Descriptions, so click the green 'add' button three times.
Define the first Object Description as 'Sender'.
Define the second Object Description as 'Receiver'.
For both these Object Descriptions: use the drop-down menu to set the value type to 'Reference: Object Type'. In the new drop-down menu that appears you can select the Object Type you want to use. Select the Object Type 'Person'. Check the third checkbox 'Use Description for names' to compose the name of Objects using the value of this Object Description. To be able to use the value of this Object Description in a quick search, check the fourth checkbox 'Use Description for quick search'.
Define the third Object Description as 'Date' and use the drop-down menu to set the value type to 'Date'. Check the third checkbox 'Use Description for names' to compose the name of Objects using the value of this Object Description. Check the fifth checkbox 'Show Description in overviews' to show the value of this Object Description as a column in overviews of Objects in this Type.
Define the fourth Object Description as 'Full Text' and use the drop-down menu to set the value type to 'Text (Tags & Layout)'. Don't check any of the checkboxes.
Once you have specified these settings, your configuration should look like this:
Sub-Objects
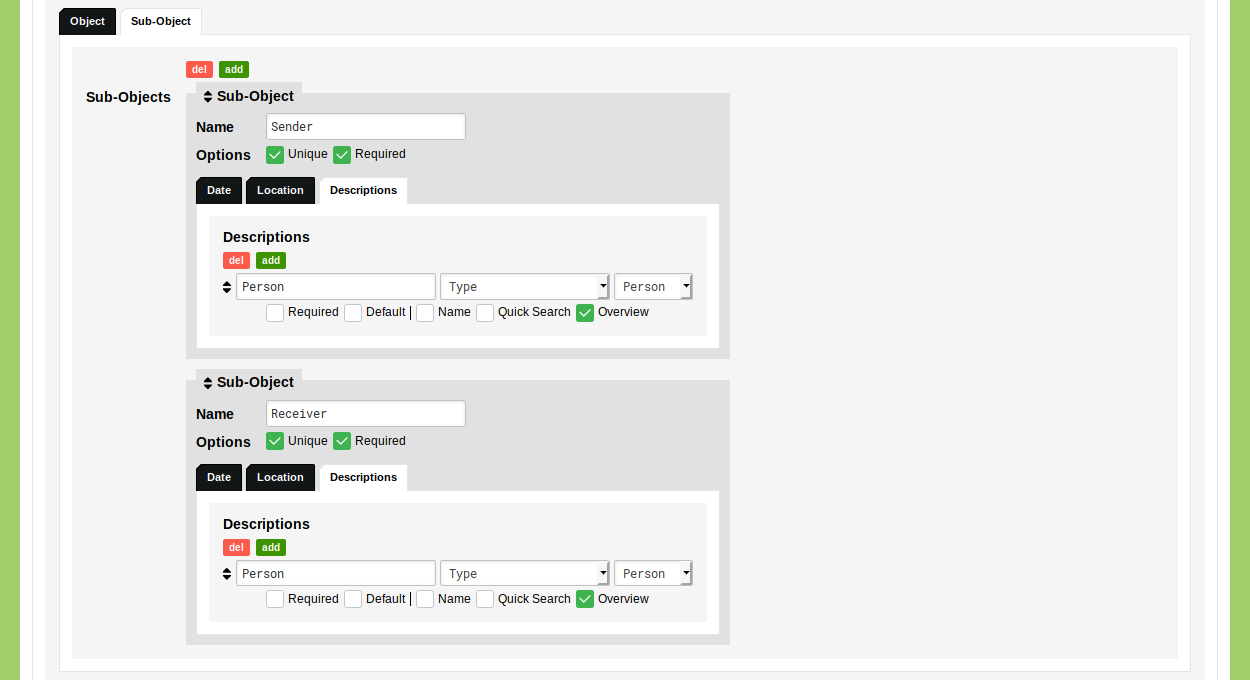
We need two Sub-Objects: one for the sending context and one for the receiving context. Go to the tab 'Sub-Objects'. Click the green 'add' button once to add one additional Sub-Object.
Define the first Sub-Object as 'Sender'. Check the 'Unique' and 'Required' checkbox and set the Date to 'Date'.
Define the Second Sub-Object as 'Receiver'. Check the 'Unique' and 'Required' checkbox and set the Date to 'Date'.
For both Sub-Objects: set the default Location Reference Type to 'City' and set the default Sub-Object used for geolocation to 'Located'.
These two Sub-Objects now define two distinct contexts associated with an Object of a letter: the time and place a letter was sent and the time and place a letter was received. To connect the person who sent the letter to the time and place of sending and to connect the person who received the letter to the time and place of receiving, you need to include a reference to these persons in each Sub-Object. To achieve this, we will make use of Sub-Object Descriptions.
For both Sub-Objects: define one Sub-Object Description as Person and use the drop-down menu to set the value type to 'Reference: Object Type'. In the new drop-down menu that appears you can select the Type you want to use. Select the Type 'Person'.
Click 'Save Type' to save your Object Type.
Even though this Object Type is now ready to be used, we will edit it one more time to enable re-usage of data. Since we defined a relationship from Letter to Person both in Object Descriptions as well as in Sub-Object Descriptions, we can configure the Type in such a way that you have to enter these references only once. We can do the same for the date of the letter that, since this used for an Object Description as well as for the date of each Sub-Object.
To do this, click the blue 'edit' button at the Type 'Letter' an go to the tab Sub-Objects'.
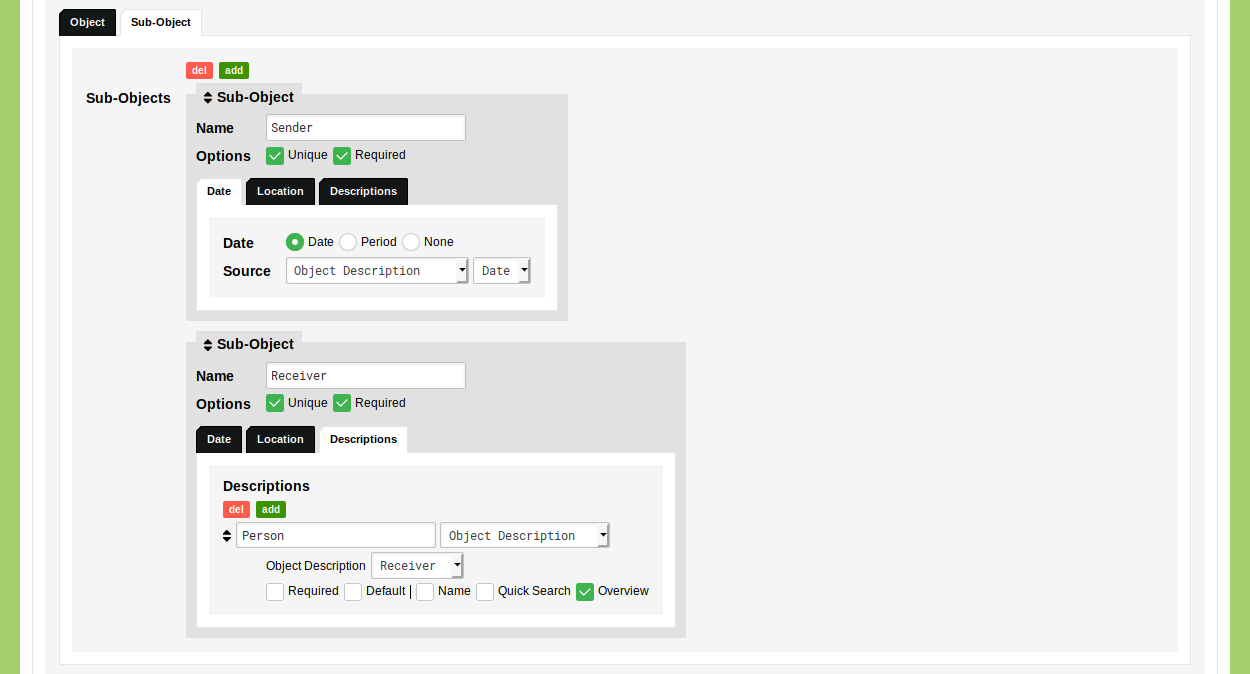
Use the drop-down menu positioned under the date settings for both Sub-Objects to specify a source for the date ('Use a specific source to be used for the date.'). Select 'Object Description' and select the Object Description 'Date' in the drop-down menu that appears.
Use the drop-down menu positioned under the Sub-Object Description to change the value type of this Sub-Object Description from 'Reference: Object Type' to 'Object Description'. Select the for the Sender Sub-Object the Object Description 'Sender'. For the Receiver Sub-Object you select the Object Description 'Receiver'.
Enable the Type 'Letter' in the Project 'Correspondence Networks'
Go to Management and go to Projects. Click the blue 'edit' button at the Project 'Correspondence Networks' to edit the Project you created earlier. In the tab 'Model' check the checkbox in front of the newly created Type 'Letter'.

Click 'Save Project' to store the changes made for this Project.
Add Objects to the Type 'Letters'
If you now go to Data and click on the tab 'Objects' you see your newly created Object Type 'Letters'. Click 'Add Letter' to add a new Letter.
As defined in the data Model, both the Description 'Sender' and 'Receiver' are relational, and can be used to create a relationship to Objects of the Type 'Person'. This means you can use the input fields to find and select Objects from the referenced Type. Click on the input field for the Object Description 'Sender' and click on the Object 'Jacob Grimm' that appears in the list of Objects from the Type 'Person'.
All input fields that have a icon are relational. If you start to type in these input fields you are querying the related Type/Classification using the quick search method. If the related Type/Classification contains a limited amount of Objects/Categories, these are shown in a list. Click the green 'new' button to add a new Object/Category or click the green 'filter' button to perform a filter on the referenced Type/Classification.
Since we only have one Object of a person in the Type Person and we don't want Jacob to send a letter to himself, we need to add a second Object to the Type Person. Click on the input field for the Object Description 'Receiver' and click the green 'new' button.

In the new dialog that appears you can enter the details of a new Object in the Type Person. We'll add a longtime correspondence partner of Jacob Grimm, Karl Lachmann (VIAF id: 64025742, d.o.b.: 04-03-1793, p.o.b.: Braunschweig, d.o.d.: 13-03-1851, p.o.d.: Berlin).
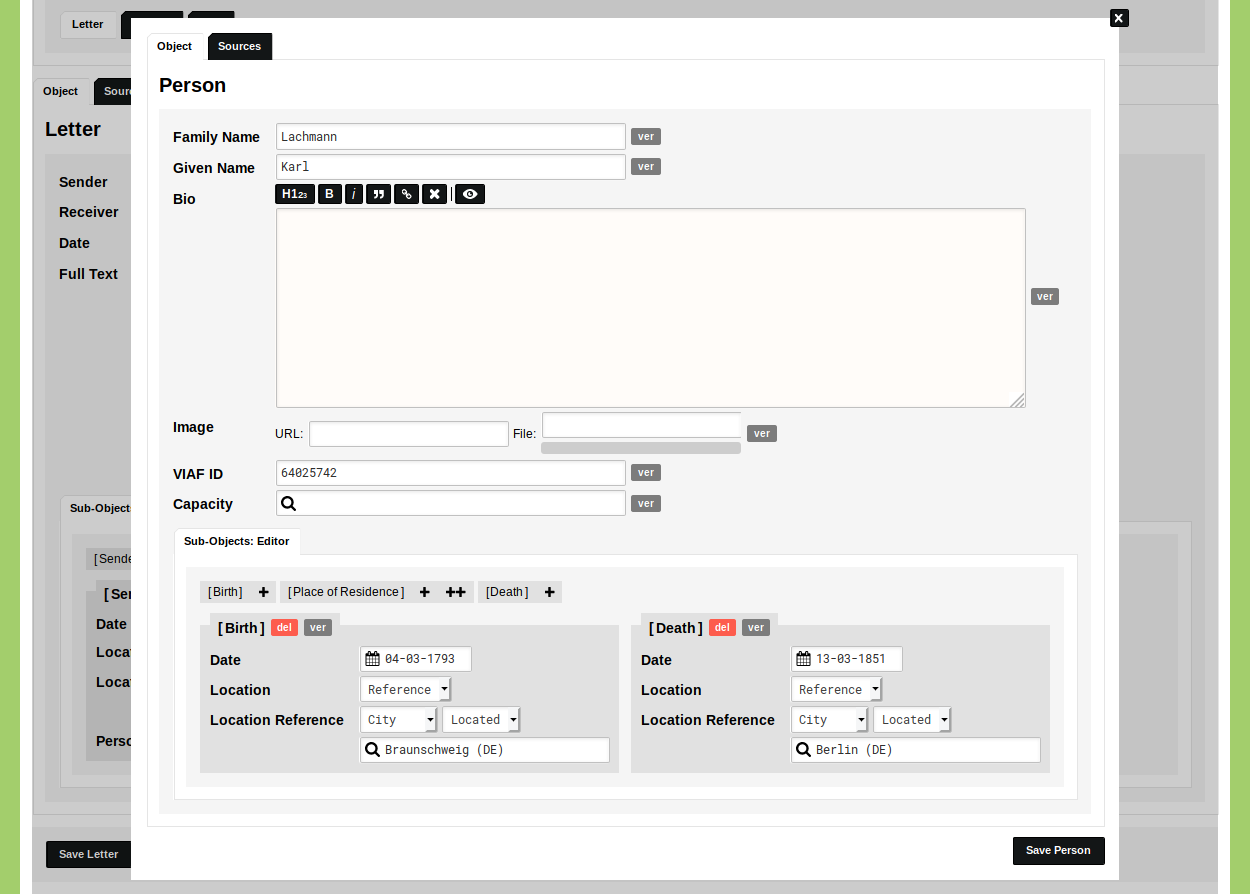
Click 'Save Person' to save this new Object and directly establish a relationship between this newly created Object and the Object of the Letter you are now creating.
Enter 14-01-1826 in the 'Date' Object Description.
Leave the 'Full Text' Object Description' blank. See the Use Cases to learn more about projects in which full texts of letters and other material has been included.
Because we set both Sub-Objects to be 'Required' they are opened by default. The 'Date' input field and the 'Person' Sub-Object Description can not be edited, since they take their values from the Object Descriptions (as you defined in the data Model). This means that you only need to set the Location References. In the Sender Sub-Object: start typing 'Kassel' to select the Object of 'Kassel (DE)' from the Type 'City'. In the Receiver Sub-Object: start typing 'Braunschweig' to select the Object of 'Braunschweig (DE)' from the Type 'City'.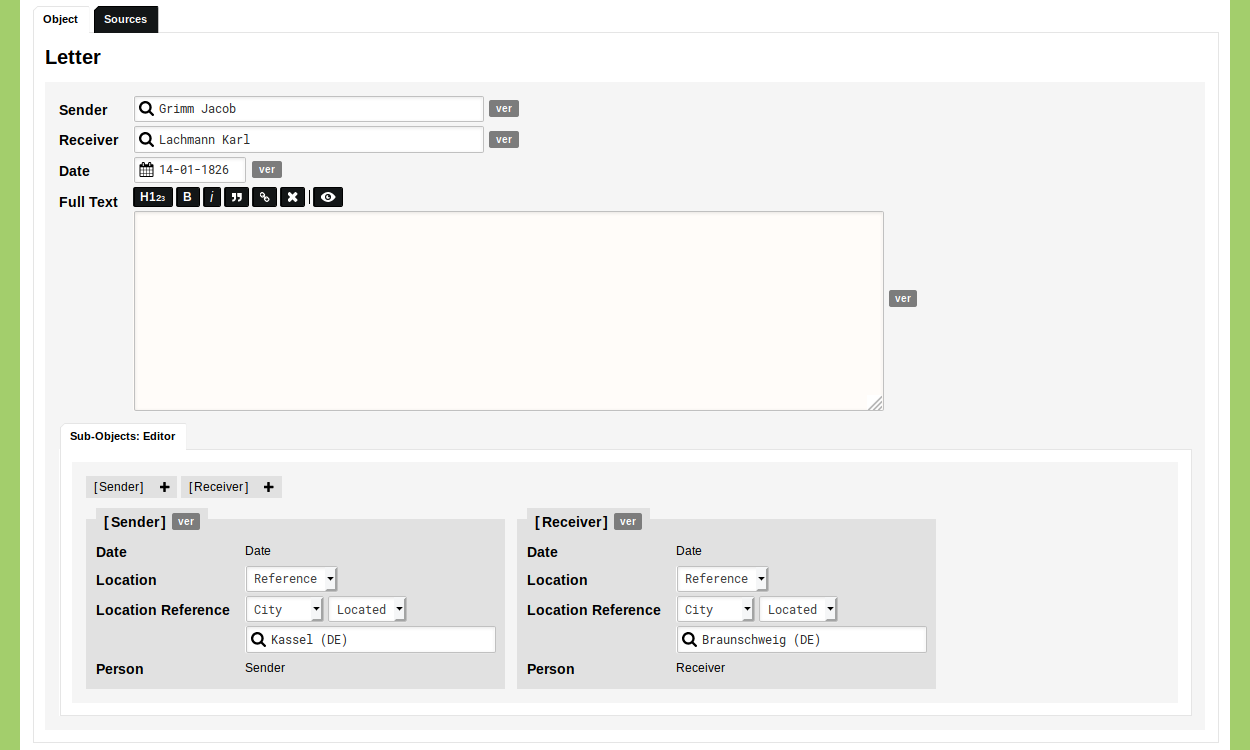
As both Sub-Objects draw their date from the same Object Description, the letter has only one date. To be able to distinguish between the date of sending and the date of reception (e.g. to better understand the effects of running time in long-distance communication), you must not enter a source for the date of these sub-objects in your data model.
Click 'Save Letter'. Once the Object is saved, click on the name of the letter to open the Object in view mode. Click on the name of the Objects of persons to follow the references to these related Objects. Click on the name of the Objects of cities used in the Sub-Objects to follow the location references to these related Objects. Here you find the actual latitude and longitude values used to geolocate the Sub-Objects of the Letter.