Import Many-to-Many Relationships
This guide is only relevant when you are importing data from a pre-existing database to nodegoat. A lot of databases use many-to-many relationships to describe relations between various entities like books and authors, movies and actors, or people and occupations, etc. In most database software, these relationships are stored in a link table, which can also be called an association table, bridge table, cross-reference table, intermediary table, intersection table, join table, junction table, etc. In this table, an identifier of a book is paired with an identifier of an author to establish a link between two entities. As each row contains one relationship, this setup works great to link multiple authors to a book, or a book to multiple authors.
You do not need a link table in nodegoat to describe many-to-many relationships. The only thing you need to do is set a relational Object Description to 'Multiple', or use a Sub-Object Description. This setup allows you to link multiple books with multiple authors, multiple movies with multiple actors, or multiple people with multiple occupations. To get a good feel of how this works, it's always advisable to start by manually entering a couple of Objects and relations before you begin running imports.
To import many-to-many relationships to nodegoat you can use the three tables that make up this data in your source database: one table of entities with identifiers, a second table of entities with identifiers, and a third table that links the identifiers of the first and second table. In this Guide we will use an example of assigning capacities to people: a person can have many capacities and a capacity can be linked to many people. We will make use of the people that have been imported in the previous Guides. These people already have an identifier associated with them: a VIAF identifier. This means that we will skip the first step of importing the first table with identifiers. This step is covered in the Guide 'Create and Run an Import Template'.
We will enrich this data with occupations that are linked to these people in Wikidata, e.g.: the Wikidata entry of Ľudovít Štúr has 9 professions. Click here to download a list of the occupations we will import. Click here to download the link table that connects the people in our database to the occupations from Wikidata: one column contains the VIAF identifier and the other column contains the Wikidata URI of an occupation. You will see that the file with the occupations has 133 rows, while the file with the relationships from a person to an occupation has 668 rows. This means that a number of the 209 people in the database will have multiple occupations and that many of the 113 occupations will be shared among several people (i.e. a many-to-many relationship).
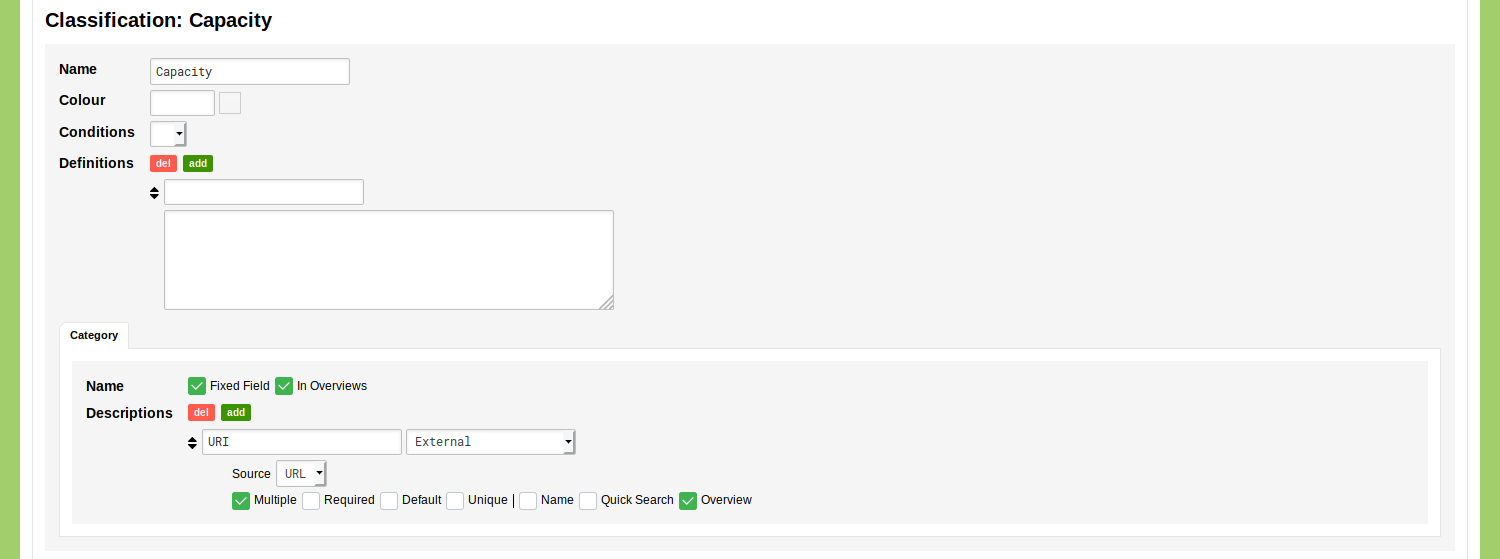
To import the identifiers of these occupations, we need to update the data Model. Go to Model and go to the tab 'Classifications'. Find the classification 'Capacity' in the list of classifications and click the blue 'edit' button. This Classification is currently configured to only have a fixed name field for each Category. We will add one Description that can host the Wikidata URI. Use the provided empty description for this and enter the label 'URI' there. Check the checkboxes next to 'Multiple' and 'Overview', which will allow you to enter multiple URIs for one capacity and to display these URI in the overview of the Classification. The model of this Classification will now look like this:
Import the Capacities
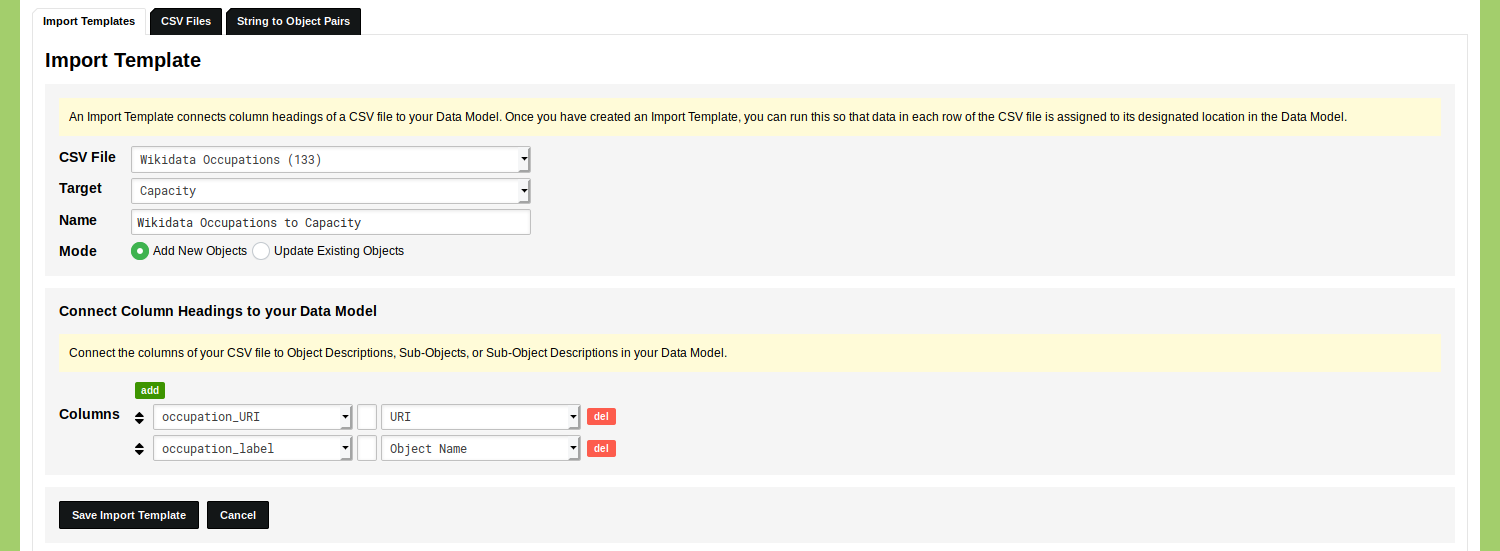
Upload the CSV file with the occupations and their Wikidata URIs. After you have uploaded this file, you go to the tab 'Import Template' and click on 'Add Import Template'. Select the uploaded CSV file that contains the occupations and the target Classification 'Capacity'. Give the Import Template a name like 'Wikidata Occupations to Capacity'. You can leave the mode of the Import Template to 'Add New Objects'.
The second part of the form is displayed that allows you to connect the headings in your CSV file to elements in the Classification you have selected. In this case you connect the column heading 'occupation_URI' to the Description 'URI and you connect the column heading 'occupation_label' to 'Object Name'.
Click 'Save Import Template'.
You now see the newly created Import Template listed in your overview of Import Templates. Click the green 'run' button on the right side of this overview and click the 'Next' button in the following screen to run this Import Template.
Navigate to the Data section of your nodegoat environment to inspect the result of your import process. You now have a Classification with 133 capacities in your environment.
Import the Links from People to Capacities
Upload the CSV file with the VIAF identifiers of the people and the Wikidata URIs of the occupations. After you have uploaded this file, you go to the tab 'Import Template' and click on 'Add Import Template'. Select the uploaded CSV file and the target Object Type 'Person'. Give the Import Template a name like 'Wikidata Occupations to Capacity'. Change the Mode to 'Update Existing Objects'.
After you have specified these settings, two new forms appear. The form with the name 'Columns used as Filter' allows you to connect the rows in your CSV file to Objects in your nodegoat environment. The form with the name 'Connect Column Headings to your Data Model' allows you to specify where the data in your CSV file should be stored.
You will use the form with the name 'Columns used as Filter' in the same way as the process that has been described in the Guide 'Update Objects': change 'Identify Objects by means of' to 'Filter' and select the column that contains the value used to identify Objects. In the first row: use the first drop-down menu to select the column heading 'viaf_id' and use the second drop-down menu to select the Object Description 'VIAF ID'. Set the other column heading to an empty value and use the red 'del' button to remove it.
In the form 'Connect Column Headings to your Data Model' find the drop-down menu that has the column heading 'occupation_URI' selected. In the same row, select the Object Description 'Capacity'. Two new drop-down menus appear. The first one states that this Object Description links to the Classification 'Capacity', as has been defined in the Model. The second new drop-down menu allows you to select an element that will be searched to create a link. Here you select the Object Description that contains the Wikidata URI, so set this drop-down menu to 'URI'.
Set the other column heading to an empty value and use the red 'del' button to remove it.

Click 'Save Import Template'.
You now see the newly created Import Template listed in your overview of Import Templates. Click the green 'run' button on the right side of this overview and click the 'Next' button in the following screen to run this Import Template.
During the run each of the 668 rows will assign one of the 133 capacities to one of the 209 people. As a result of this, there will be people who will have been assigned more than one capacity.
Navigate to the Data section of your nodegoat environment to inspect the result of your import process. You now have 166 people with at least one capacity. Running the Social Visualisation gives you an overview of the distribution of the capacities: 'Alexander von Humboldt' has 21 capacities, 'Jaroslav Pospíšil' has 1 capacity. You will also notice that the capacity 'writer' has been assigned to 78 people, while the capacity 'science fiction writer' has been assigned to only one person.