Upload a CSV File
You need two things to import data to nodegoat: a data model and a CSV file. If you have not created data model yet, you can follow the guide on creating an Object Type to learn how to do this. Once you have a data model up and running, it is best to enter small numbers of Objects to your Types and Classifications manually. This will help you understand how nodegoat works and what kind of data nodegoat expects.
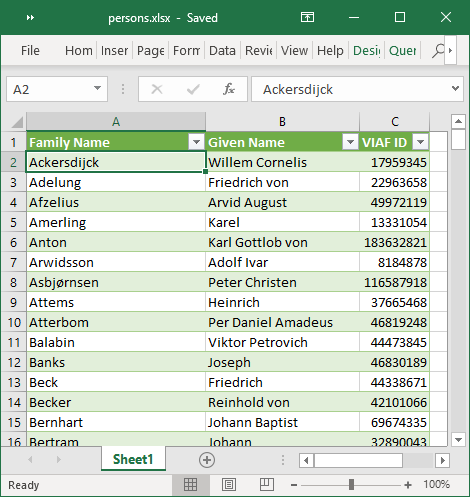
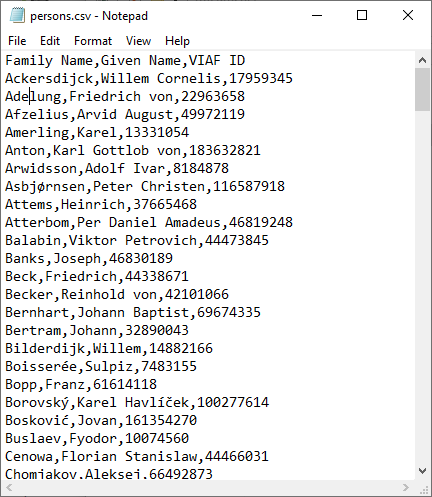
CSV stands for "comma-separated values". A CSV file is a text file in which values are delimited by commas: it is a spreadsheet without any kind of formatting. You can generate CSV files with every spreadsheet application, using the 'Save As' option. Below you see the same data side by side in a spreadsheet application and as a CSV file:
 |  |
If you have trouble storing special characters like 'ý' or 'č', make sure that you use a character encoding that contains all the characters used in your spreadsheet. UTF-8 is a character encoding capable of encoding all Unicode characters and is also used by nodegoat, which means that no conversion is done after you upload the file. For this reason it is best to store all your CSV files using UTF-8 character encoding.
The next section demonstrates how to create a CSV file using various spreadsheet applications. You can follow these steps with your own data. In case you have a file with multiple sheets, you need to repeat these steps for every sheet. The resulting CSV files can be imported separately to nodegoat.
If you don't have data in a spreadsheet, but still want to run an import, you can download the CSV file shown above here.
Microsoft Excel
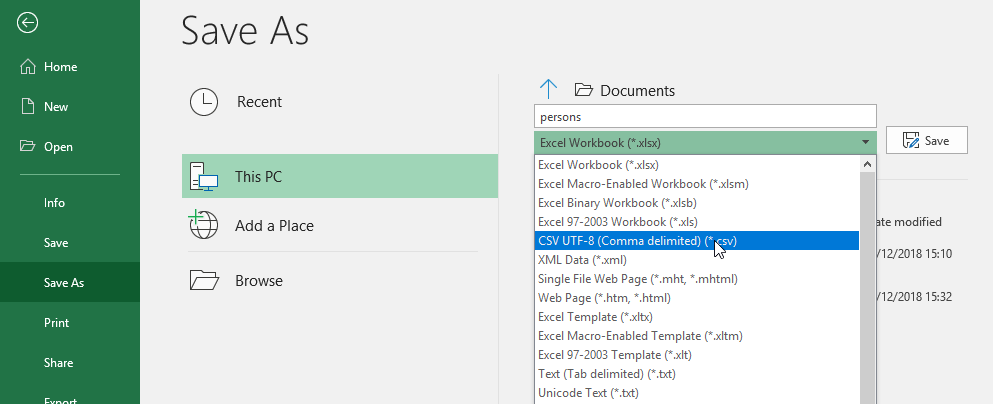
Click 'File' and click 'Save As'. Open the drop-down menu that is set to Excel Workbook (*.xlsx) and change this to CSV UTF-8 (Comma delimited) (*.csv) (do not use the other CSV file types, as these do not use UTF-8 encoding). Click 'Save' and close the file. You now have two files in your folder: 'persons.xlsx' and 'persons.csv'. Right click the CSV file and open the file in notepad (or any other plain text editor) to see a textual representation of the spreadsheet.
If the option CSV UTF-8 (Comma delimited) (*.csv) is not be available in your version of Microsoft Excel, select the file type CSV (Comma delimited) (*.csv), and click on 'Tools' and 'Web Options', and select Unicode (UTF-8) in the tab 'Encoding'.
When you experience any difficulties in storing properly encoded CSV files while using Microsoft Excel it may be useful to try LibreOffice Calc. LibreOffice Calc has a much more intuitive approach to storing properly encoded CSV files.
LibreOffice Calc
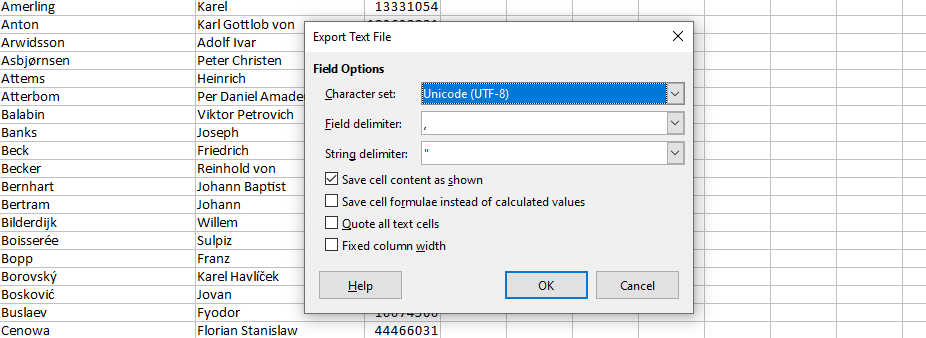
Click 'File' and click 'Save As'. Open the drop-down menu that is set to ODF Spreadsheet (.ods) (*.ods) and change this to Text CSV (.csv) (*.csv). If a dialog is shown with the message 'This document may contain formatting or content that cannot be saved in the currently selected file format "Text CSV"', click 'Use Text CSV Format'. The dialog that is shown next allows you to set the options used to store your CSV file. In the drop-down menu with the label 'Character set' you select Unicode (UTF-8). In the drop-down menu with the label 'Field delimiter' you select , (the default value). In the drop-down menu with the label 'String delimiter' you select " (the default value). Leave the check-boxes to their default values. Click 'OK' and close the file. You now have two files in your folder: 'persons.ods' and 'persons.csv'. Right click the CSV file and open the file with a plain text editor to see a textual representation of the spreadsheet.
Google sheets
Click 'File', click 'Download as', and select 'Comma-separated values (.csv, current sheet)'. Find the CSV file in your Downloads folder. Right click the CSV file and open the file with a plain text editor to see a textual representation of the spreadsheet.
Database software
You can generate CSV files from any type of database software like Microsoft Access or FileMaker. These software packages offer various options in terms of selecting delimiters, enclosure characters, and encoding settings.
Upload your file
Go to Model and Import. Click on the tab 'CSV Files'. Click 'Add CSV File'. Enter a name and a short description of your CSV file and use the upload field to locate your CSV on your computer. Click 'Save CSV File'. You will see the uploaded CSV file appear in the list of CSV files.
Now that you have a CSV file, you are ready to connect this to your data model using an 'Import Template'.