Create your own Gazetteer
A gazetteer is a geographical index or dictionary of place names. While gazetteers may include various kinds of information (see the Wikipedia article), they are mostly used to create lists of place names with their corresponding latitude and longitude values.
There are many examples of existing gazetteers that you can use in your research project to geocode your data. The next guide on import an existing gazetteer will demonstrate how to import existing gazetteers into your nodegoat environment.
In many cases, however, there might be no gazetteer available. This could be because you are interested in a very specific subset of locations, or the list of locations you want to use does simply not exist. In these cases, nodegoat is an excellent tool for creating your own gazetteer.
This guide demonstrates how to set up a data model that will host the gazetteer. Next, you will learn how to enter spatial data. Finally, this guide will show how to use the gazetteer to geocode other data.
Data Model
The first thing you do when you want to store new data is adapting your data model. In this case we need a Type of Objects that has one Sub-Object to store the spatial data. In the guide on storing locations you have seen that a Sub-Object allows you to store latitude and longitude data.
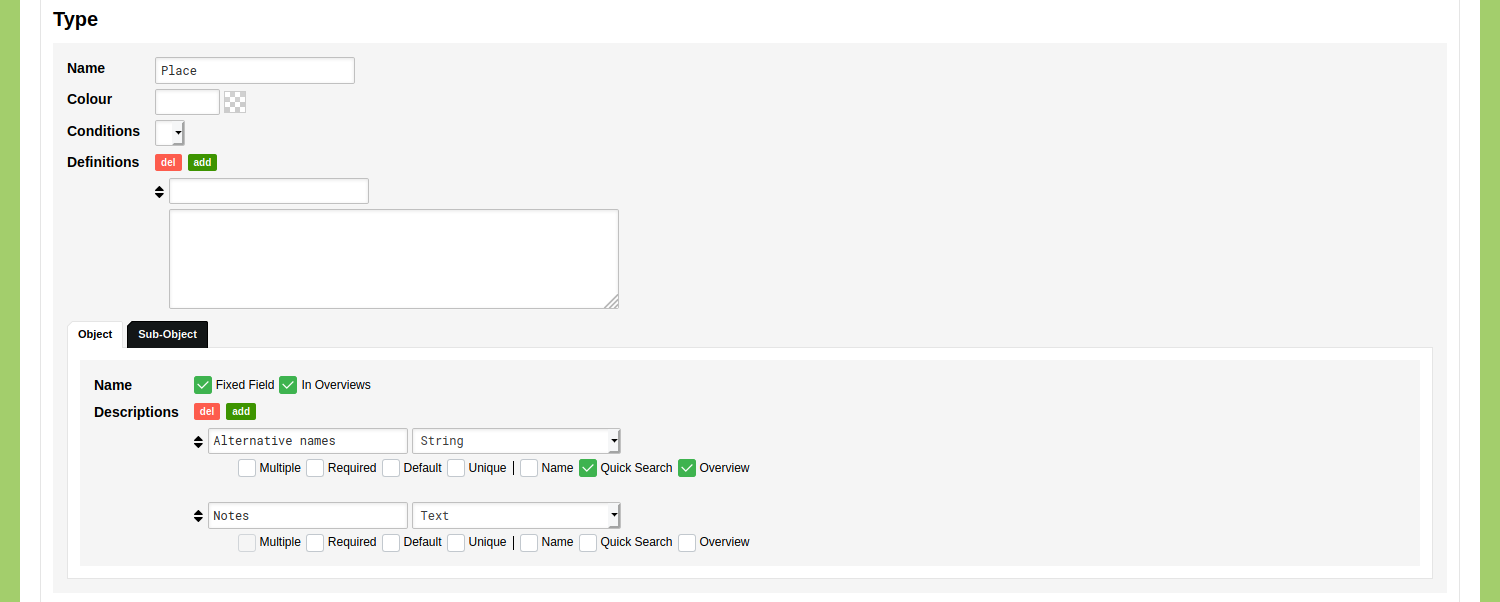
To make an Object Type for your locations, go to Model and go to the tab 'Object Types'. Click 'Add Object Type'. Enter the name of this Type in the 'Name' field. It is up to you how you name your gazetteer. If you want to store a specific kind of location like temples, or forests, you could give this Type the name 'Temple', or 'Forest'. You can also give your gazetteer a more generic name like 'Place', so you can use this to store any kind of spatial statement.
Leave the 'Fixed Field' option for the Object Name checked so you can use a single input field for Object Names.
Click the green 'add' button next to the label 'Descriptions' once, so you can define two Object Descriptions. Give the first Object Description the name 'Alternative Names' and call the second Object Description 'Notes'. Use the drop-down menu to set the value type of the second Object Description to 'Text'. For the first Object Description: check the checkbox 'Multiple', 'Quick Search', and 'Overview', to be able to store multiple alternative names, that can be queried by means of the quick search functionality, and that are shown in the overview of Objects. Read the guide on creating your first Object Type to learn more about these settings.
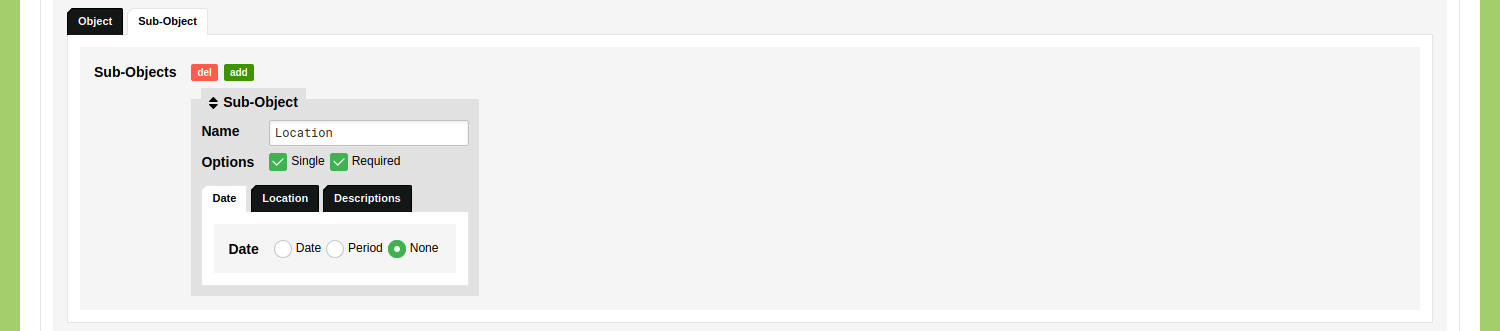
Switch to the tab 'Sub-Object' to define a Sub-Object for this Object Type. We need only one Sub-Object here as the gazetteer is essentially a pair of a name and a single spatial statement. Call the Sub-Object something like 'Location' and check the checkbox for the 'Single' option and for the 'Required' option. If you want to specify a period for when the location was in use, you can set the date option to 'Period'. If you want to use the locations without specifying any kind of temporality, you can set the date option to 'None'.
Click 'Save Object Type'. Go to Management and select 'Projects'. Add a new project, or edit an existing one, in order to be able to work with this new Object Type. Enable the newly created Object Type in your project.

Data Entry
Now that you have made an Object Type for your gazetteer, you can start adding Objects for the various locations you want to use.
If you would be running a project on social ties and family relations between the nobility of the Low Countries in the late Medieval period, you could create a gazetteer of castles or estates. You can decide to build this gazetteer organically as the project progresses, i.e. adding new locations as they appear in the sources. You can also decide to first compile a list of the various locations you will be using in your research project. Either way, you will be adding these locations one by one in your environment.
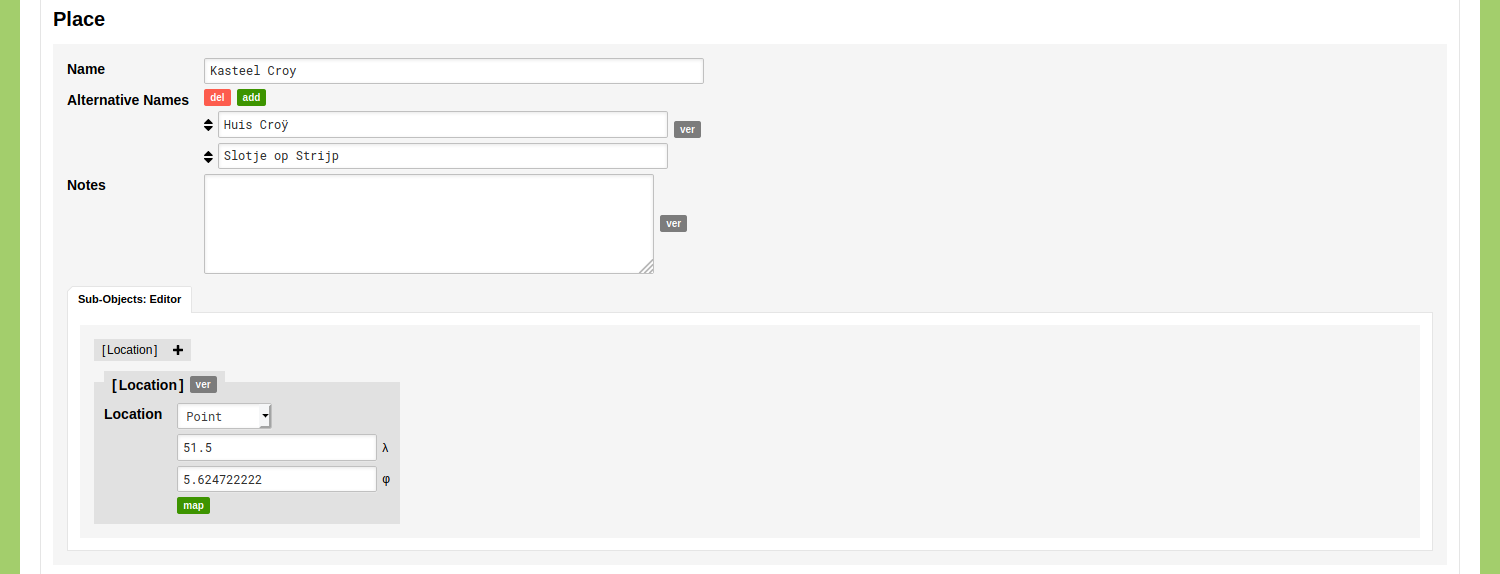
Go to the Data section of your environment and select the Object Type you just made. Click 'Add Place' to add a new Object of this Type. You can now enter data based on the model that you have implemented. Enter a name for the location in the input field for the name. If you have other information available, you can add this in the Object Descriptions 'Alternative Names' and 'Notes'.
In the Sub-Objects editor you can enter a location for this Object. To do this, change the location option from 'Reference' to 'Point'. Use the green 'map' button to find and click a location on the map, or enter the latitude and longitude values you have found elsewhere.
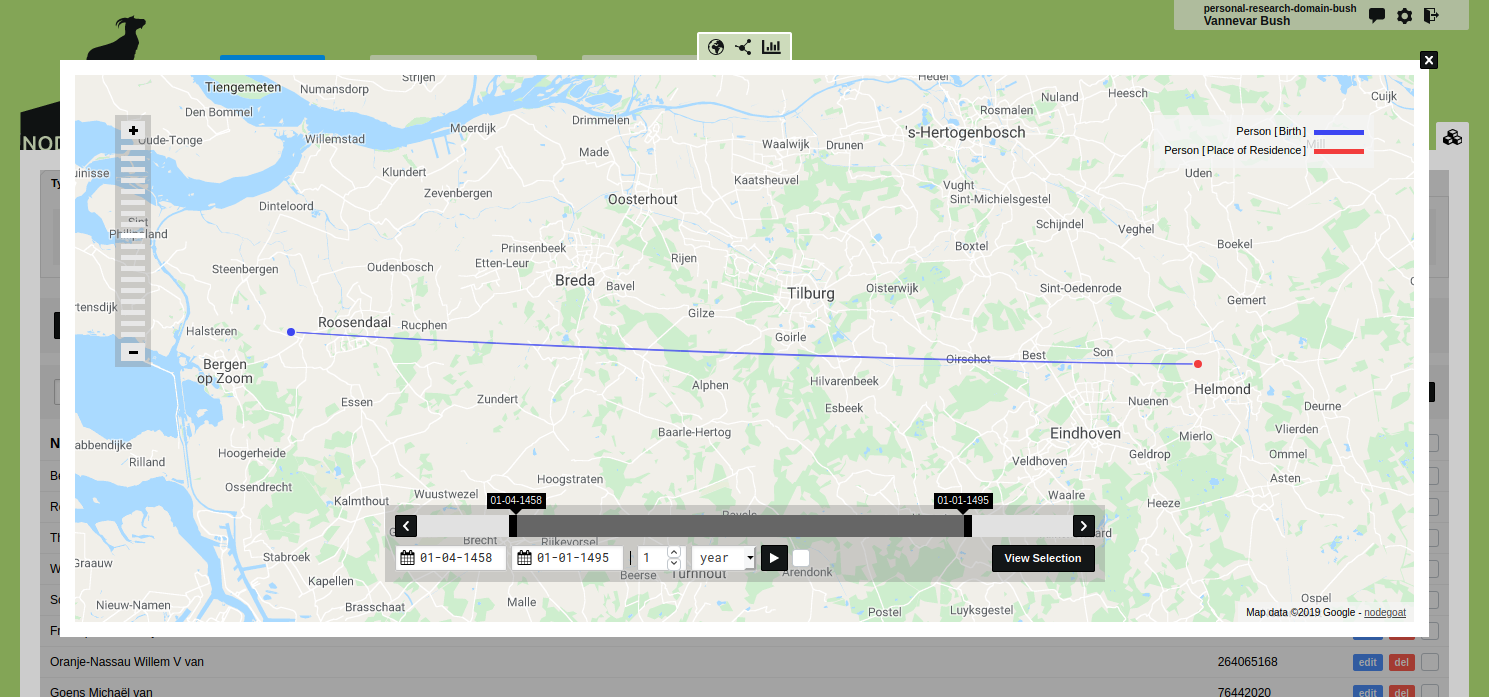
You can run the geographic visualisation to inspect this data on a map. After you have added additional castles, the visualisation will produce a geographic representation of the gazetteer.
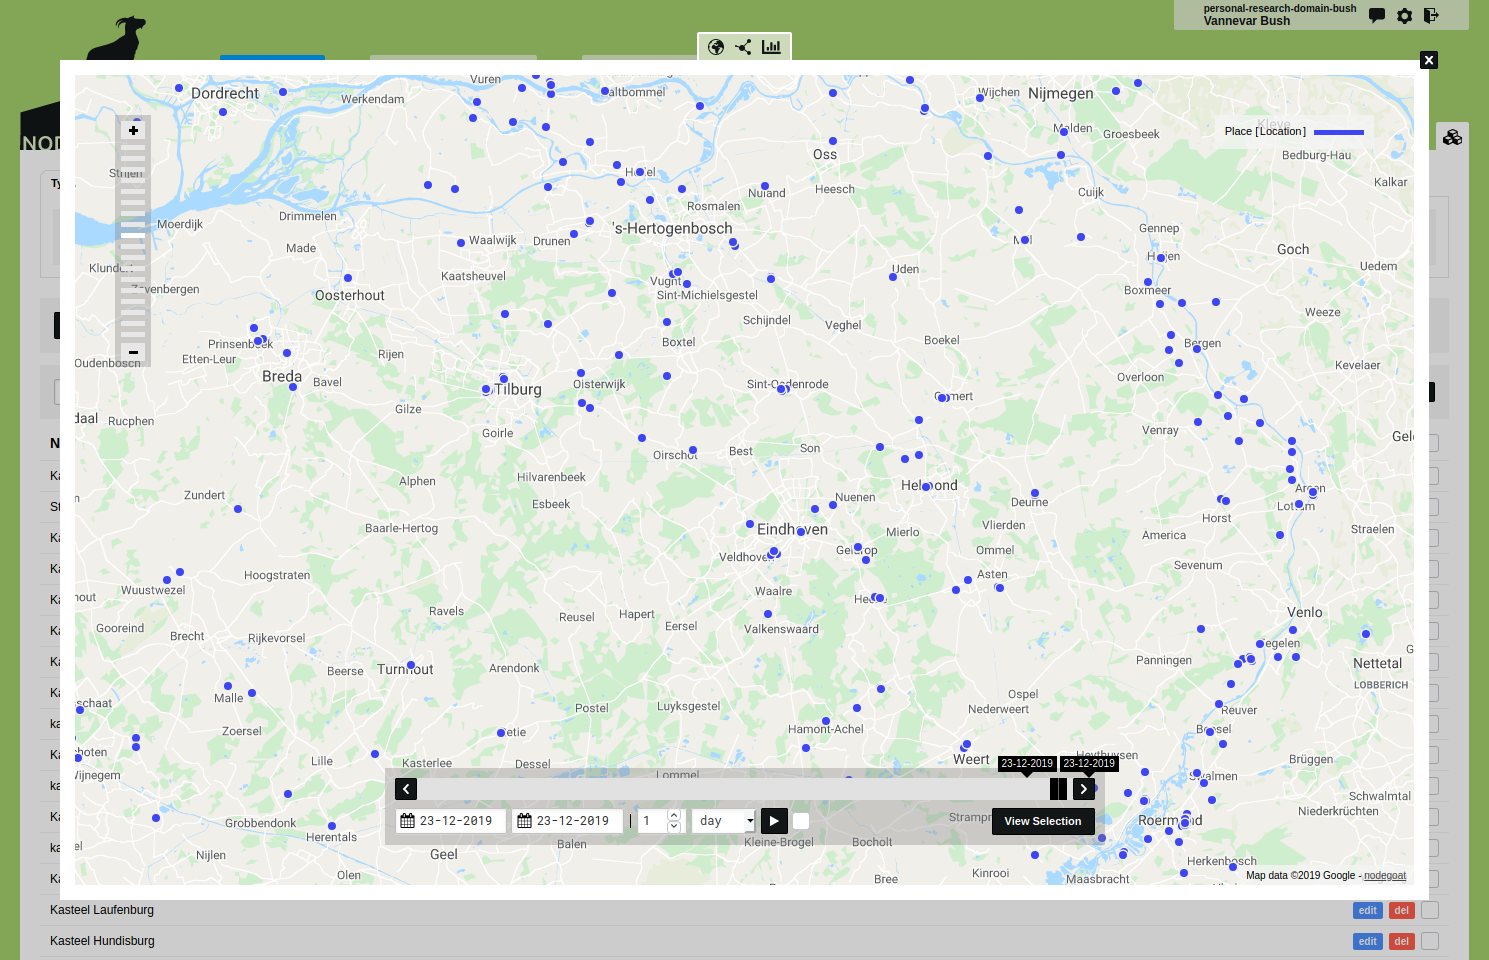
Using the Gazetteer
You can use these locations to geocode other Objects in your environment. You can use the castles that you have entered to specify places of birth or places of residence for the people in your database. To do so, go to the Object Type 'Person' and click 'Add Person'. Enter a family name and a given name and go to the Sub-Objects editor to specify the Birth and a Place of Residence for this person. Set the location option to 'Reference' and change the Object Type to 'Place'. You can now start to type in the input field with the magnifying glass to select a castle from your gazetteer.
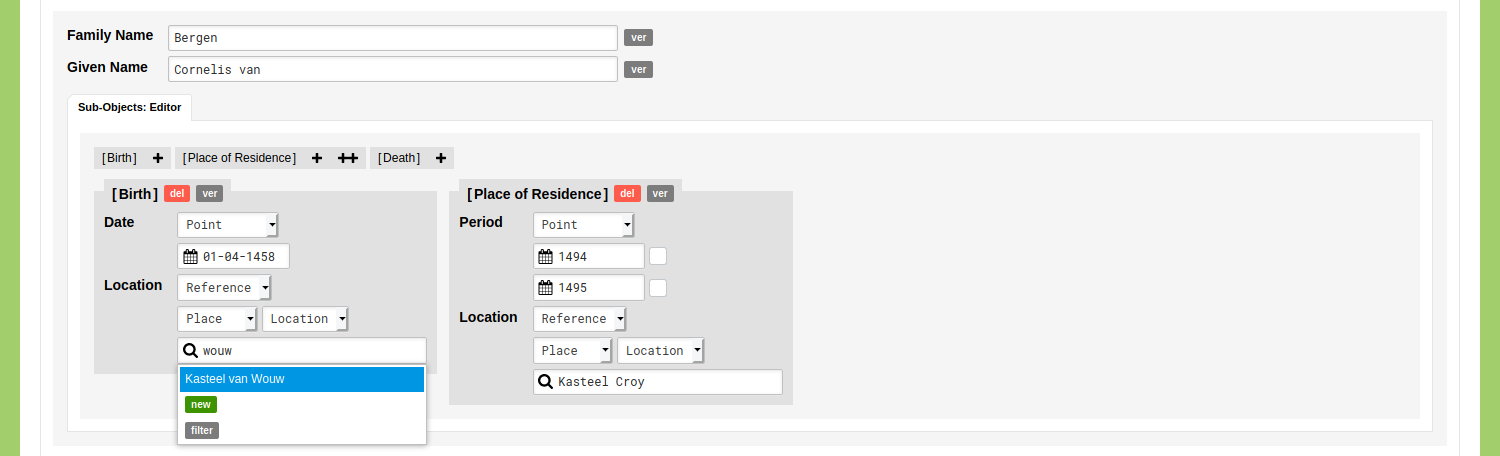
Click 'Save Person' and run the geographic visualisation to inspect this data on a map.